Below we have given step-by-step instructions on how to download all Gmail emails using the Google Takeout service.
Download Gmail Emails Using Google Takeout
Google Takeout is a separate service, so you will have to access the Google Takeout website and sign in using your Google account. On the next page, you will see all the supported Google services with a “Green” button next to them. Assuming you are only looking to download Gmail data, click on the “Select none” button at the very top to unselect all the Google products.
Now scroll down to the “Mail” product and click on the “gray” button next to it to select it (it will turn green).
To further customize what you want to download (which you should), click on “Mail” and choose “Select labels” from the options.
By default, only the main 6 Gmail labels will be selected that contain all your emails, other Gmail data such as email in Trash or Spam, your synced Call logs or SMS and third-party managed emails will not be selected. If you want the other data as well, select it on this page and click on “Done”.
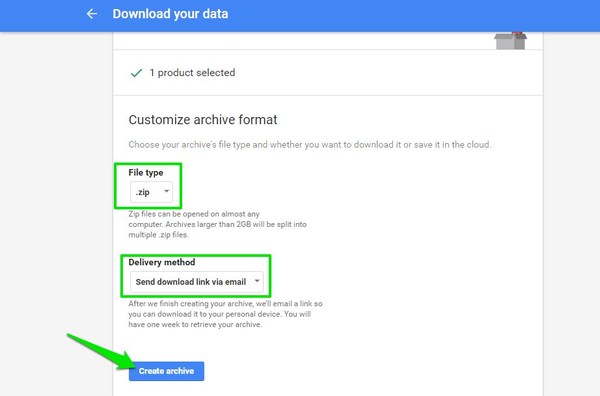
Tip: You may also like to select the “Contacts” product if you are interested in downloading all your contacts in Gmail as well. After selecting all the mail data, click on “Next” at the bottom and select File type and Delivery method in the next step. If you don’t know which File type to choose, then .zip should work fine for you. For the delivery method, you can either send the archive file to a cloud storage service or get a download link via email to download the archive in your PC. After selecting the right options, click on the “Create archive” button below to start the process.
Depending on the size of data you have in Gmail, it can take quite some time to create an archive and send it to you (even hours and days). For my 318MB archive file, it took approximately 15min to receive the download link via email. Once you download the archive, you will have to extract the .zip file using Windows built-in extractor or a third-party archiver like 7-Zip. In the “Mail” folder of the Takeout archive, you will find an MBOX file that contains all your Gmail emails. Mbox file format is made for email clients to read, so your operating system will not be able to open it. Below we have explained what you can do with the Mbox file.
Open Mbox File and View Emails Offline
If you don’t want to import the Mbox file to another email client, then you can also view the file in your PC using a Mbox file viewer. I really liked the free Windows MBox Viewer for this purpose that is free and very easy to use, but it is only for Windows. If you are on Mac, you can give MBOX Viewer a try. Download and open Windows MBox Viewer. Click on the “File” menu and choose “Select folder” to select the “Mail” folder you got in the Takeout archive. This will add the folder in MBox Viewer and you will see all the emails in the above panel. You can click on each email to preview it in the window below and also interact with it.
There aren’t many features or customization options, but you should be able to search, read and interact with the emails without losing any details. Apart from viewing the emails offline, you can also import Mbox file in an email client to transfer all the emails to it. For example, you can move the downloaded Gmail emails to Thunderbird or even to another Gmail account. Here is an article on how to import an MBOX file in Thunderbird or any other email service.
Conclusion
Downloading all your Gmail emails on your PC is a great way to back up Gmail emails and have a copy to access offline. If you are planning on using this method to download and backup Gmail emails on your PC, then you will have to occasionally go through the whole process to update the backup and also delete the old Mbox file. Furthermore, dealing with the Mbox file can be a little confusing, if the above instructions weren’t enough or there is something confusing you; feel free to let us know in the comments and we will be more than happy to help.


